

|
|
|
| |
|
|
||||
 |
| |
| FIB > Computing laboratory > Services > Access from home > Access to the PC network |
Català | Castellano | |
|
|
|
|
|
Access to the PC networkLast modified: 14-06-2002
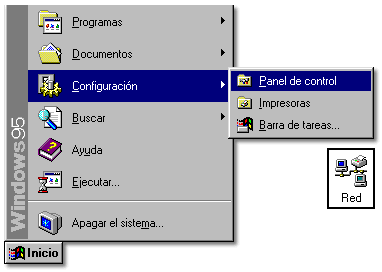
v3.1: 7 September 1999 This document explains how to configure the Microsoft Windows 9x network for access to the FIB network file server. This does not guarantee that you can run all the software installed, since the DLL files are missing locally on FIB computers. The first step is to install and configure the necessary network devices in order to work with a Microsoft Network. In order to do this, go to the network configuration menu. This can be done by going Start Button, Configuration, Control Panel and double-clicking on the Network icon, or (quicker) by right-clicking on the network devices icon and choosing Properties.
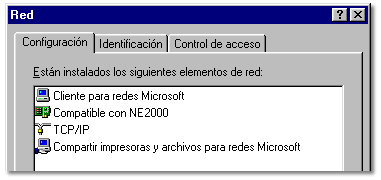
Both will open the same menu. This menu has three tabs:
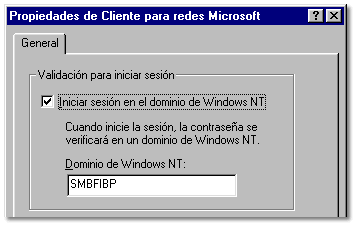
1.1 ConfigurationThis tab shows the network devices currently installed; Add, Remove and Properties buttons for the devices; a pull-down menu in order to determine what type of network appears as the primary log-in (whether you log-in to Novell or the Microsoft Network first), and a button to configure resource sharing on your PC. Add client for Microsoft NetworksThis is the first step to take if you find "Microsoft Network Client" is not on your list of installed devices. Click on the Add button. It will ask you what kind of element you want to add. Choose Client and click on Add. You will get a menu with a list of manufacturers and clients. Choose Microsoft and Microsoft Network Client. Click on OK. This will bring you back to the network configuration menu, and the new device will now appear on the list. Configuring the Microsoft Network ClientChoose Microsoft Network Client and click on Properties. Make sure the option Start session in Windows NT Domain is checked in the next window and that the domain is set to SMBFIB
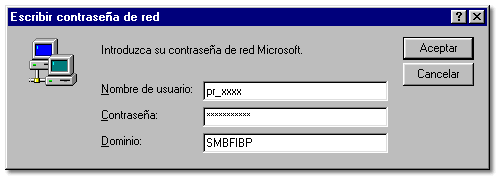
TCP/IP ConfigurationIt is very possible that you already haveTCP/IP installed. If this is not the case, follow the same steps as you did for the Microsoft client installation (this time, choose TCP/IP from the list of protocols). It is also possible that various TCP/IP devices (if you have a modem, for example) appear on the list. If this is the case, you need to configure the network card device you will be using to access the PC server: your local network card, for example. Go to the Links tab to make sure that the Microsoft network client is linked to the TCP/IP protocol (the client should not be linked to any other protocol. For example, make sure it is not linked to the NetBeui protocol if you have it installed). 1.2 Identification tabThe next step is to configure your PCs identity. The two most important settings are PC name, which should be the same as its DNS name; and Workgroup which you can set to any, although you needn't change it if you already have it set to a workgroup. 1.3 Access Control tabThis tab only makes sense if you activate resource sharing. For now, unless you really know what you are doing, just check the Resource access control option. 1.4 Accept the changes and begin the installationFollow all the steps and click on OK in the network configuration menu. This will install all the necessary elements, and it will ask you to insert the Windows 9x installation CD. Depending on your PC's configuration, the installation procedure may involve backing up files that are already on your system. If this is the case, say Yes to keeping the most recent versions. Once the files are copied, reboot so the new network configuration is applied. When you load Windows, a new authentication window will appear (for the NT domain). Whether this window appears first or not depends on the order you chose in the option first session initiation. In this window, you will have to type the teacher's username for fusió (pr_xxxx where xxxx is the subject abbreviation), the password and the SMBFIB domain.
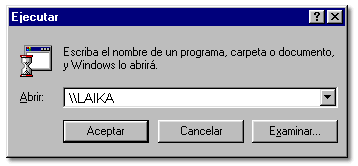
Once logged on to the student server, there are two ways of accessing the directories: 2.1 Access via the run commandChoose Run from the Start menu. This allows direct access to fusió. In order to do this, type the following command:
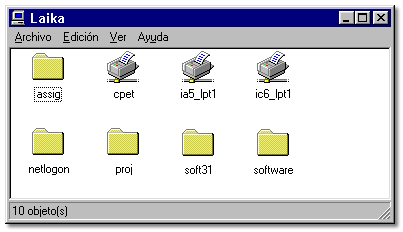
Now you can see the folders (e.g., assig, software, scratch and your own account folder) and the computer room printers. You should have read/write access on your account (only you can access this folder), read access for the software folders and most of the subject folders (subjects that you manage, or that have no access restrictions) and read/write access on your own folder.
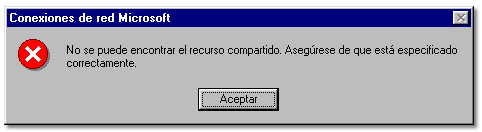
2.2 Device mappingYou can map any of the main folders on the PC network to a device from the Windows explorer. In order to do this, run \\FUSIO, right click on the appropriate folder, and choose the option Connect network device. The problems you might run into when using this client usually arise when connecting. The most common problem is for your system not to find the server or the shared resources:
Many of these problems are solved in Windows 95 by installing the latest operating system patch. In order to access correctly, the following updates are necessary (in the specified order):
Please contact the School or Computing Laboratory that provides your department with technical support in order to find out what updates you are missing. The incorrect use of these patches could disturb the system configuration and make Windows 9x unstable. These patches should NOT be used for Windows 98. 3.1 Limitations
|  |
|
|||||
 |
| |
 |
Copyright © Facultat d'Informàtica de Barcelona - webmaster fib.upc.edu fib.upc.edu |